
[Docker/DinD] Empowering Local Development: Simulating Mass Containers and Docker Swarm Nodes with Docker-in-Docker (DinD)
Introduction
In the realm of modern software development, the use of containerization has revolutionized the way applications are developed, tested, and deployed. Docker, a popular containerization platform, allows developers to create lightweight and isolated environments known as containers. However, when dealing with scenarios involving multiple containers that require isolated environments, testing and debugging can become quite a challenge. Enter Docker-in-Docker (DinD), a powerful tool that alleviates these pains and streamlines the development process.
Problem Statement
Imagine a server-client architectural project where the client component needs to consistently map a specific host port, let’s say 3000. This situation poses a problem when running multiple client instances on a localhost environment. Traditionally, developers might resort to creating virtual machines (VMs) to achieve this goal. Unfortunately, VMs can be heavy in terms of resource consumption and memory usage, especially when the purpose is to run a single Docker instance for a specific duration. Even lighter VM solutions like Multipass require separate setup of the Docker environment, which adds complexity.
Introducing Docker-in-Docker (DinD)
Docker-in-Docker, often abbreviated as DinD, is an approach that enables you to run a Docker container inside another Docker container. This concept might sound complex, but it brings remarkable simplicity to testing and debugging scenarios that involve multiple containers.
Advantages of Using DinD
-
Isolated Environments: DinD allows you to create isolated environments for each container you’re testing, which mimics real-world deployment scenarios without cluttering your local environment.
-
Resource Efficiency: Unlike full-fledged VMs, DinD containers are lightweight and consume fewer resources. This is particularly beneficial for developers working on devices with limited memory.
-
Simplified Setup: With DinD, you don’t need to set up a separate Docker environment within a VM. The entire setup is contained within a Docker container, making the process more streamlined.
-
Port Mapping: In our example of a server-client architecture, DinD can effortlessly handle the port mapping scenario. Each client container can map port
3000without conflict, enabling concurrent testing.
How to Get Started
Using Docker-in-Docker is surprisingly straightforward. Follow these steps to get started:
- Pull the DinD Image: Pull the official Docker-in-Docker image using the command:
docker pull docker:dind
- Run a DinD Container: Run a DinD container, allowing it to access the Docker socket of the host system. This enables the container to spawn and manage other containers.
docker run --privileged --name dind-container -d docker:dind
-
Access the DinD Container: You can now access the DinD container just like any other container using
docker exec. Inside this container, you can run your client and server containers. -
Run Your Containers: Within the DinD container, execute your client and server containers with the necessary configurations. For example:
docker exec -it dind-container docker run -p 3000:3000 -d client-image
docker exec -it dind-container docker run -p 8080:8080 -d server-image
Addressing Specific Challenges with Docker-in-Docker (DinD) Solutions 💡
1. Effortless Mass Docker Swarm Node Setup
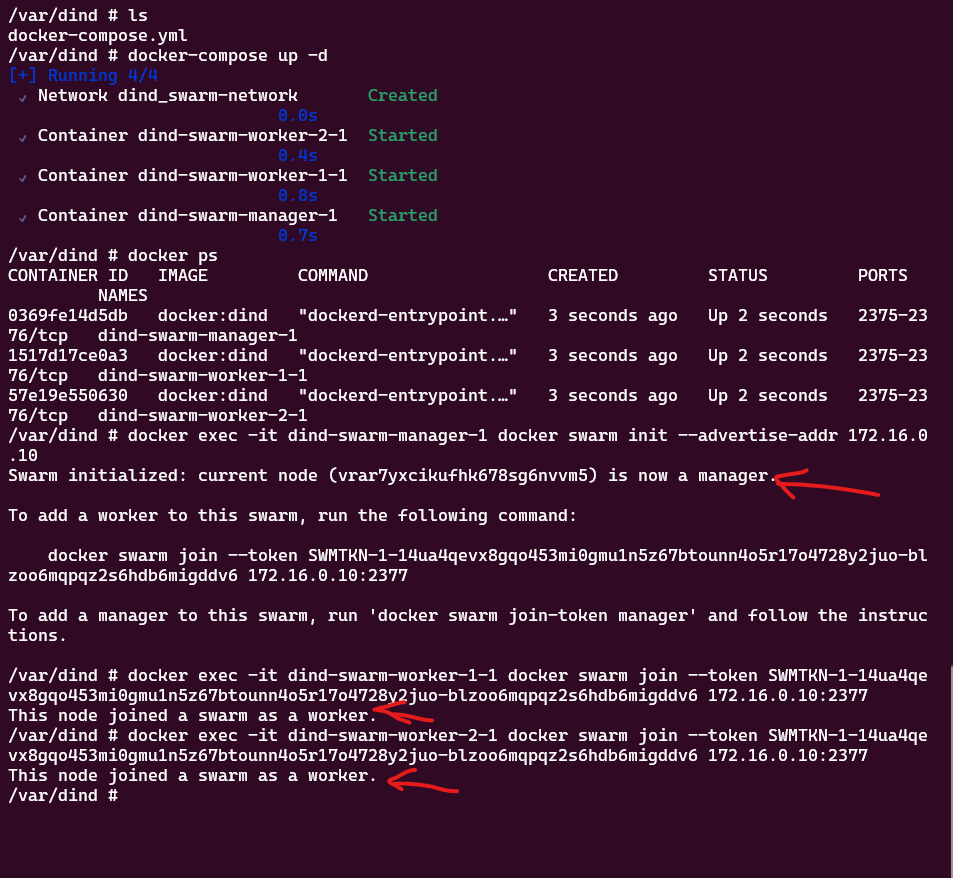
When faced with the task of installing multiple nodes in a Docker Swarm cluster, DinD emerges as an elegant solution. Bypass network configuration complexities by effortlessly creating DinD containers within the same network, all achieved through a single Docker Compose file.
 1version: '3'
 2services:
 3  swarm-manager:
 4    image: docker:dind
 5    privileged: true
 6    networks:
 7      swarm-network:
 8        ipv4_address: 172.16.0.10
 9
10  swarm-worker-1:
11    image: docker:dind
12    privileged: true
13    networks:
14      - swarm-network
15
16  swarm-worker-2:
17    image: docker:dind
18    privileged: true
19    networks:
20      - swarm-network
21
22networks:
23  swarm-network:
24    driver: bridge
25    ipam:
26      config:
27        - subnet: 172.16.0.0/24
💡Line 8: Assign IP address to the manager node, so it can accurately specify the advertise-addr for manager node.
1docker-compose up -d
2docker exec -it swarm-swarm-manager-1 docker swarm init --advertise-addr 172.16.0.10
3docker exec -it swarm-swarm-worker-1-1 docker swarm join --token <token> 172.16.0.2:2377
4docker exec -it swarm-swarm-worker-2-1 docker swarm join --token <token> 172.16.0.2:2377
💡Line 2: Adjust docker container name swarm-swarm-manager-1 based on your environment.
2. Simulating Mass Containers for Client-Server Application (Example: Portainer or DroneCI)
To vividly demonstrate the simulation of numerous containers in a client-server architecture, let’s consider Portainer or DroneCI as prime examples. Harness DinD containers to effectively orchestrate multiple client and server containers, effectively capturing the essence of the architecture in action.
2.1. Portainer
Portainer is an open-source container management platform that provides a graphical user interface (GUI) for managing Docker environments. It allows users to easily deploy, manage, and monitor Docker containers, images, networks, and volumes through a web-based interface. Portainer supports both standalone Docker installations and Docker Swarm clusters, making it suitable for managing containerized applications across different environments.
Portainer is designed with Server and Agent architecture, which is a distributed setup that allows for centralized management and monitoring of Docker environments.
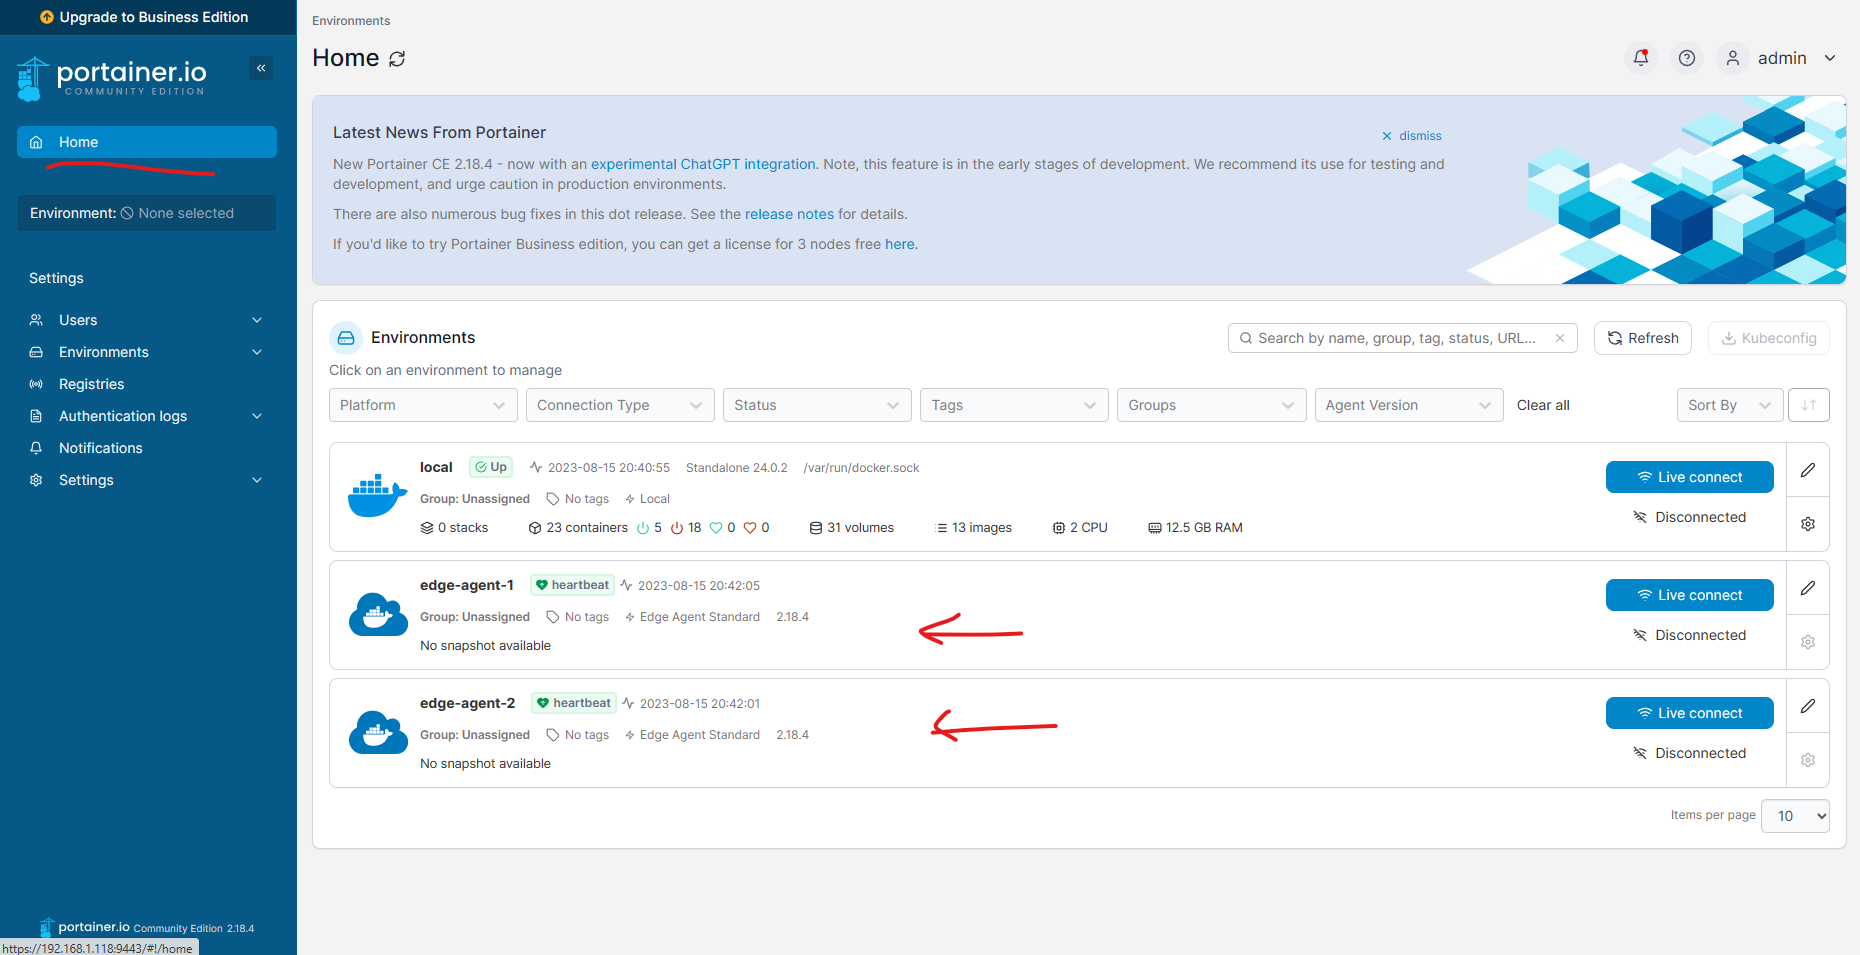
Let’s create a Portainer instance with 2 Edge Agents. Create Portainer CE instance first with the following command:
1docker volume create portainer_data
2
3docker run -d -p 8000:8000 -p 9443:9443 --name portainer --restart=always -v /var/run/docker.sock:/var/run/docker.sock -v portainer_data:/data portainer/portainer-ce:latest
Type the URL https://localhost:9443 in your browser to access the Portainer CE instance.
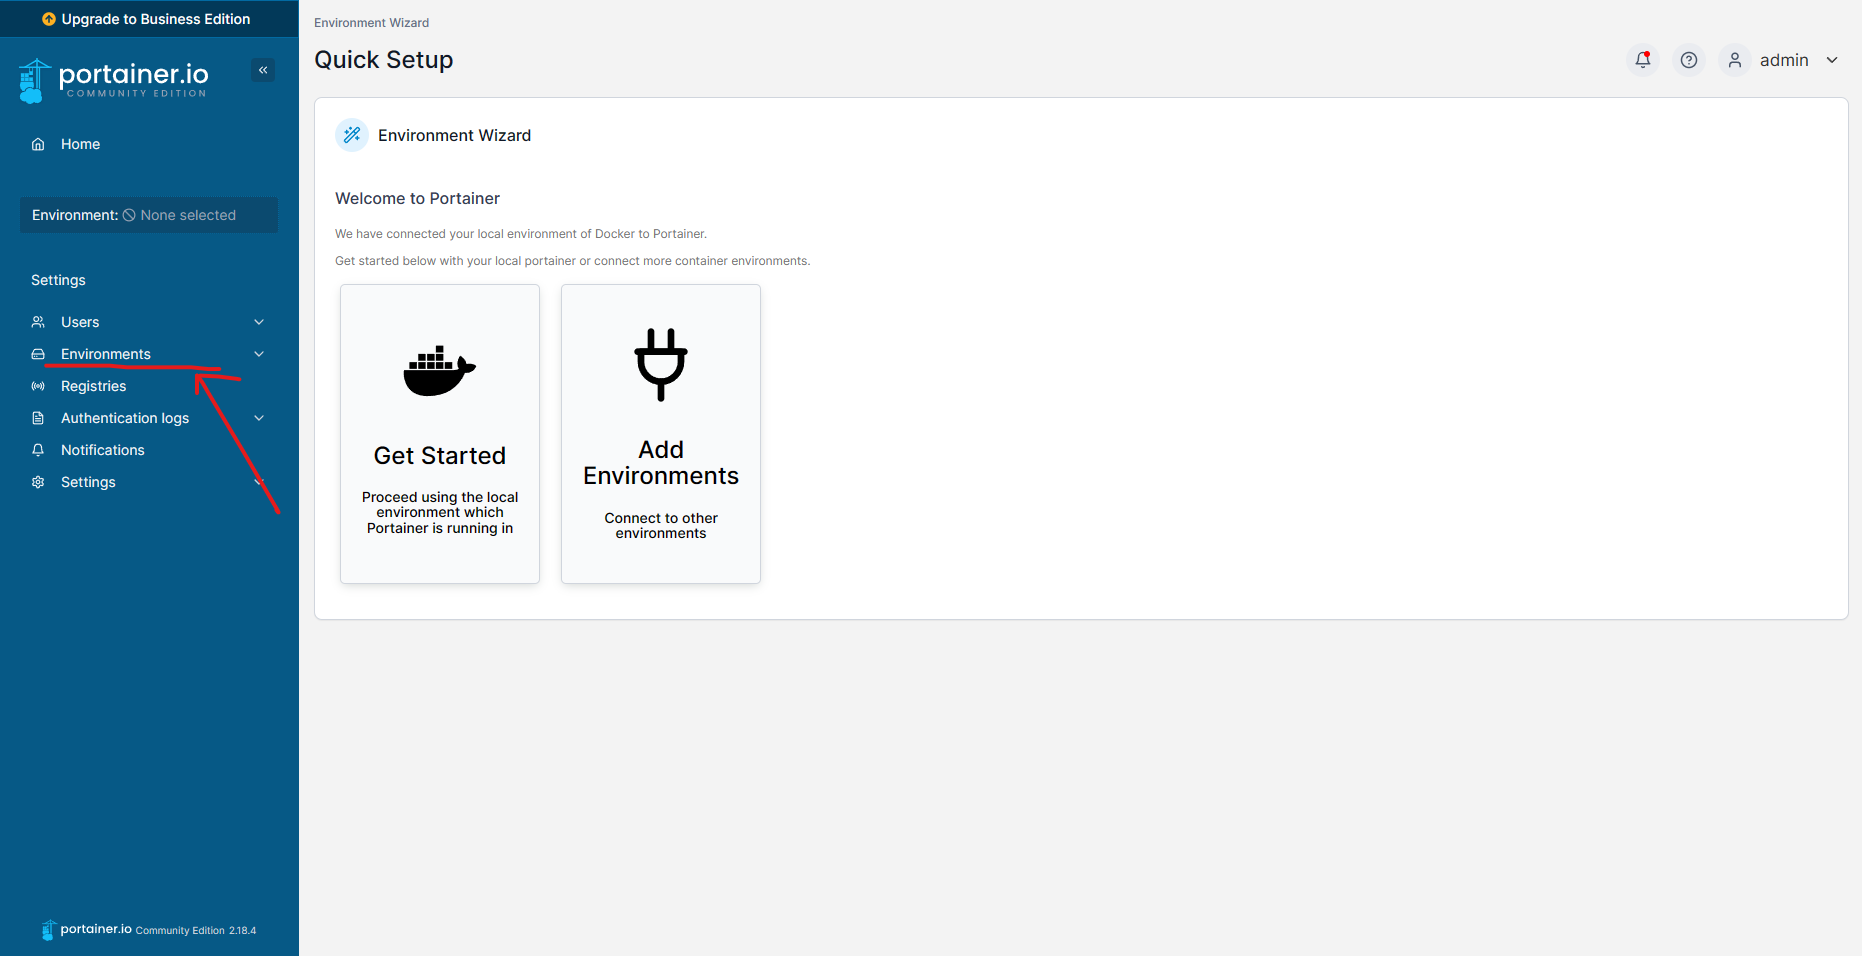
Add an Edge agent from the UI and copy the command to join the agent to the Portainer CE instance.
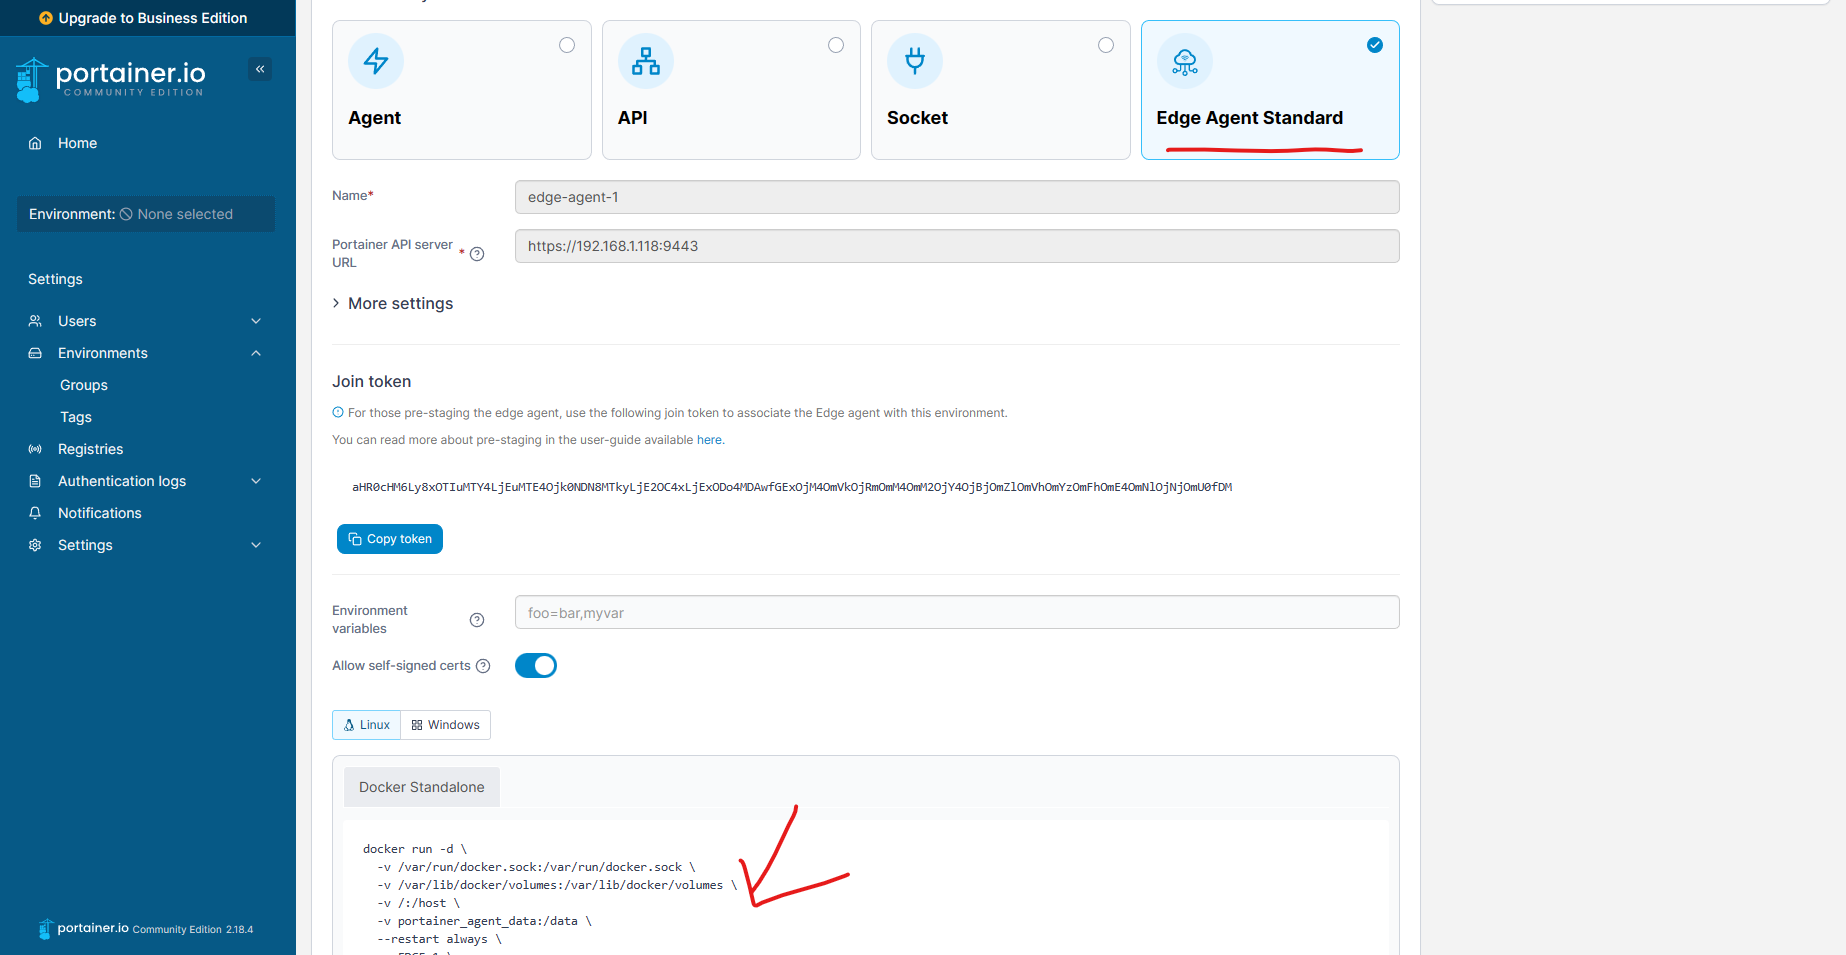
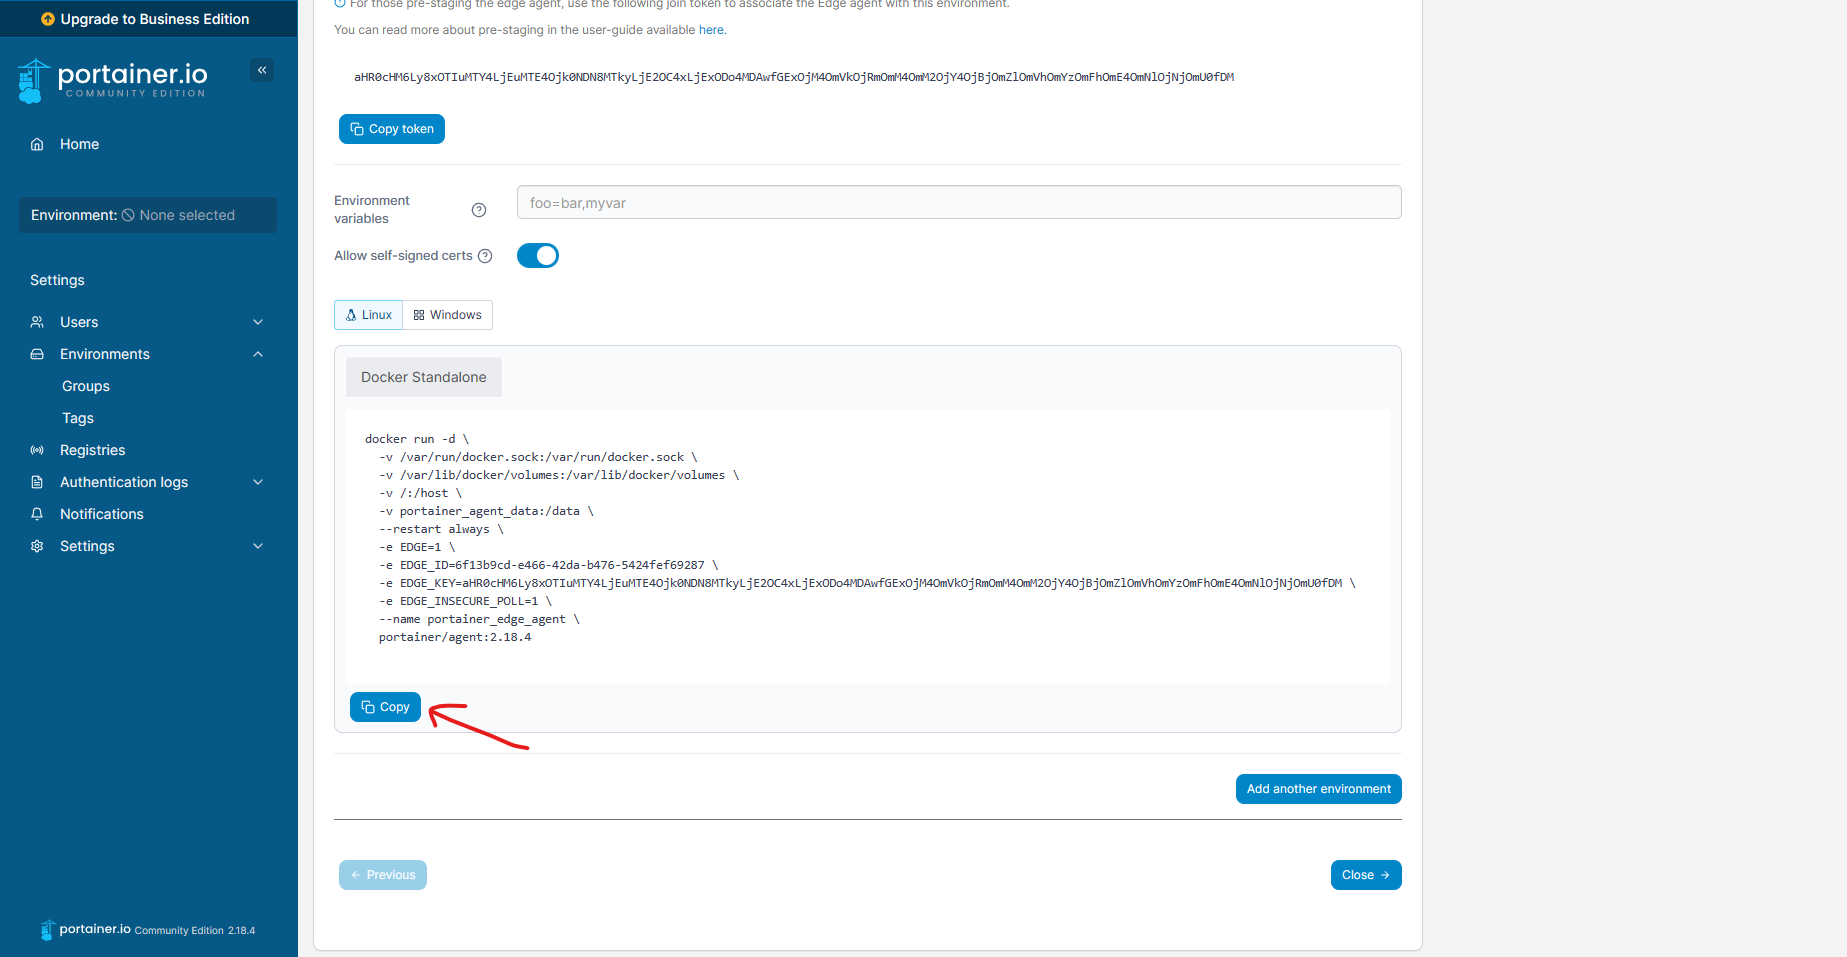
docker run --privileged --name portainer-agent-1 -d docker:dind

docker exec -it portainer-agent-1 docker run -d \
  -v /var/run/docker.sock:/var/run/docker.sock \
  -v /var/lib/docker/volumes:/var/lib/docker/volumes \
  -v /:/host \
  -v portainer_agent_data:/data \
  --restart always \
  -e EDGE=1 \
  -e EDGE_ID=97130542-f8cf-4fbe-a89a-064513d4cd1f \
  -e EDGE_KEY=aHR0cHM6Ly8xOTIuMTY4LjEuMTE4Ojk0NDN8MTkyLjE2OC4xLjExODo4MDAwfGExOjM4OmVkOjRmOmM4OmM2OjY4OjBjOmZlOmVhOmYzOmFhOmE4OmNlOjNjOmU0fDM \
  -e EDGE_INSECURE_POLL=1 \
  --name portainer_edge_agent \
  portainer/agent:2.18.4
Repeat the same steps to add another Edge agent.
Easy Hah! Immerse yourself in the practical implementation guided by above detailed steps.
2.2. DroneCI
DroneCI, on the other hand, is a popular open-source continuous integration and delivery (CI/CD) platform. It helps automate the process of building, testing, and deploying software applications. DroneCI integrates with source code repositories such as GitHub, GitLab, and Bitbucket, and it can be used to trigger automated build and deployment processes whenever changes are made to the codebase.
DroneCI follows a server and runner architecture that enables continuous integration and deployment of software applications.
The DroneCI Server is the central control plane responsible for managing the CI/CD pipelines and coordinating the build and deployment processes. It provides a web-based user interface where users can configure their pipelines, manage repositories, and view build logs and status. The Server interacts with source code repositories (e.g., GitHub, GitLab) to detect changes and trigger pipeline execution.
The DroneCI Runner, also known as an agent or executor, is responsible for executing the individual steps/tasks defined in the CI/CD pipeline. It runs on separate machines, such as virtual machines or dedicated servers, and performs the actual build, test, and deployment actions specified in the pipeline configuration.
3. Navigating Docker API Backward Compatibility
In projects that necessitate interaction with Docker APIs while accommodating backward compatibility concerns, DinD is a versatile ally. Developers can seamlessly spin up a DinD container sporting a specific Docker version tag, enabling thorough testing without the need to upgrade or downgrade the local Docker engine. Once testing concludes, shut down the container without leaving a trace in the development environment.
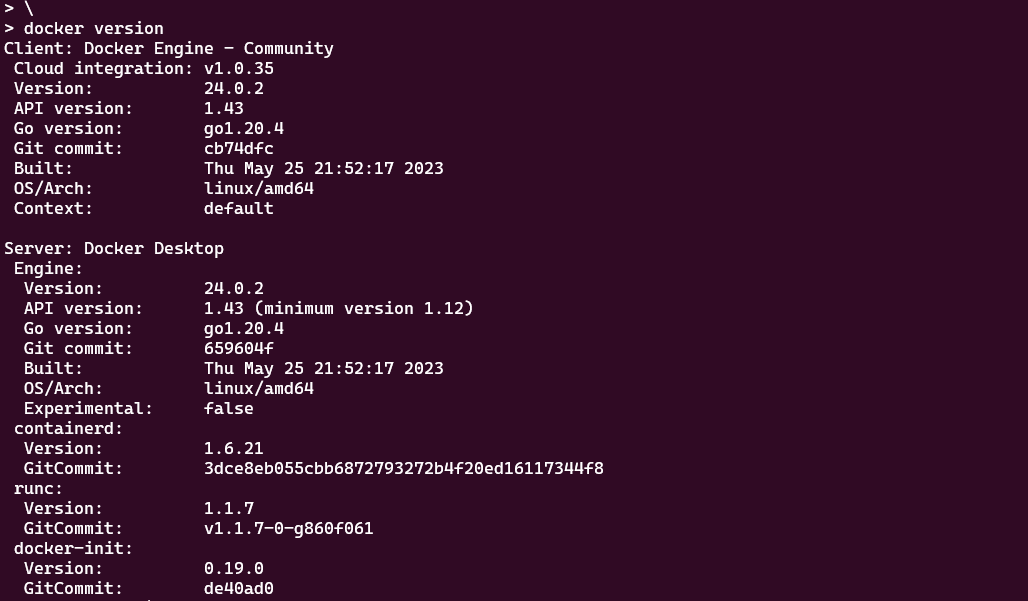
Docker version on my local machine is as below:
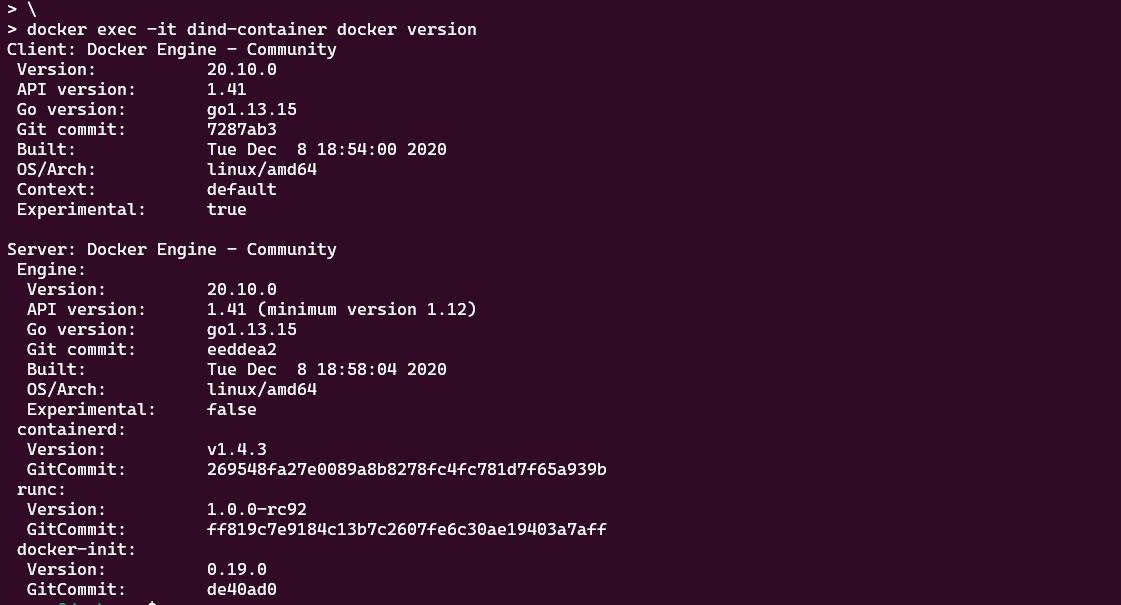
Now I want to test the backward compatibility of Docker API with version 20.10.0. We can easily achieve this by running a DinD container with the specific Docker version tag.
1docker pull docker:20.10.0-dind
2docker run --privileged --name dind-container -d docker:20.10.0-dind
3docker exec -it dind-container docker version
Conclusion
Docker-in-Docker (DinD) is a game-changer when it comes to testing and debugging complex scenarios involving multiple containers. Its ability to provide isolated environments, resource efficiency, and simplified setup makes it an invaluable tool for developers striving to enhance their development workflow. By leveraging DinD, you can bid farewell to the heavy burden of VMs and make way for a smoother, more agile development process. So why not give it a try and unlock a new dimension of containerization convenience?
Enjoyed this article? Support my work with a coffee ☕ on Ko-fi.
