
It’s a moment of sudden panic when your reliable Oracle Cloud Always Free instance is disabled and you encounter an error message stating:
Instance is disabled and will not accept any action requests. Please contact customer support to reenable.
Before you rush to delete the instance or rebuild your server, pause. There’s an effective recovery process you can follow to regain access to your self-hosted services with minimal disruption. This guide will walk you through the steps that helped me recover my services smoothly when Oracle reduced the Ampere A1 allowance.
First: Don’t Delete the Instance
The first thing to understand is that deleting the instance is the worst action you can take. When your Oracle Cloud Instance goes offline and displays the disabled message, it’s essential to preserve the integrity of your server. Terminating the instance or deleting the boot volume might lead to the loss of data, which can be left intact despite the suspension of service. Refrain from performing actions like replacing the boot volume or forcefully rebooting the server.
In my experience, despite the instance being frozen, the boot volume - and all my crucial data such as Docker volumes, configuration files, databases, application data, and operating system files - remained safe and sound (with the notice of period). This reassures you that your data is not lost and can be salvaged if approached correctly. In essence, the initial step involves ensuring you preserve the current state of your server until a proper course of action is executed.
Step 1: Back Up the Boot Volume
Before taking any corrective actions, your immediate task is to back up the boot volume. This backup acts as a safety net, protecting your valuable data against potential mishaps during the recovery process. To locate this, navigate to the OCI Console, then to Storage -> Block Storage -> Boot Volumes. Create a Boot Volume Backup from here. This action doesn’t require the instance to be operational.
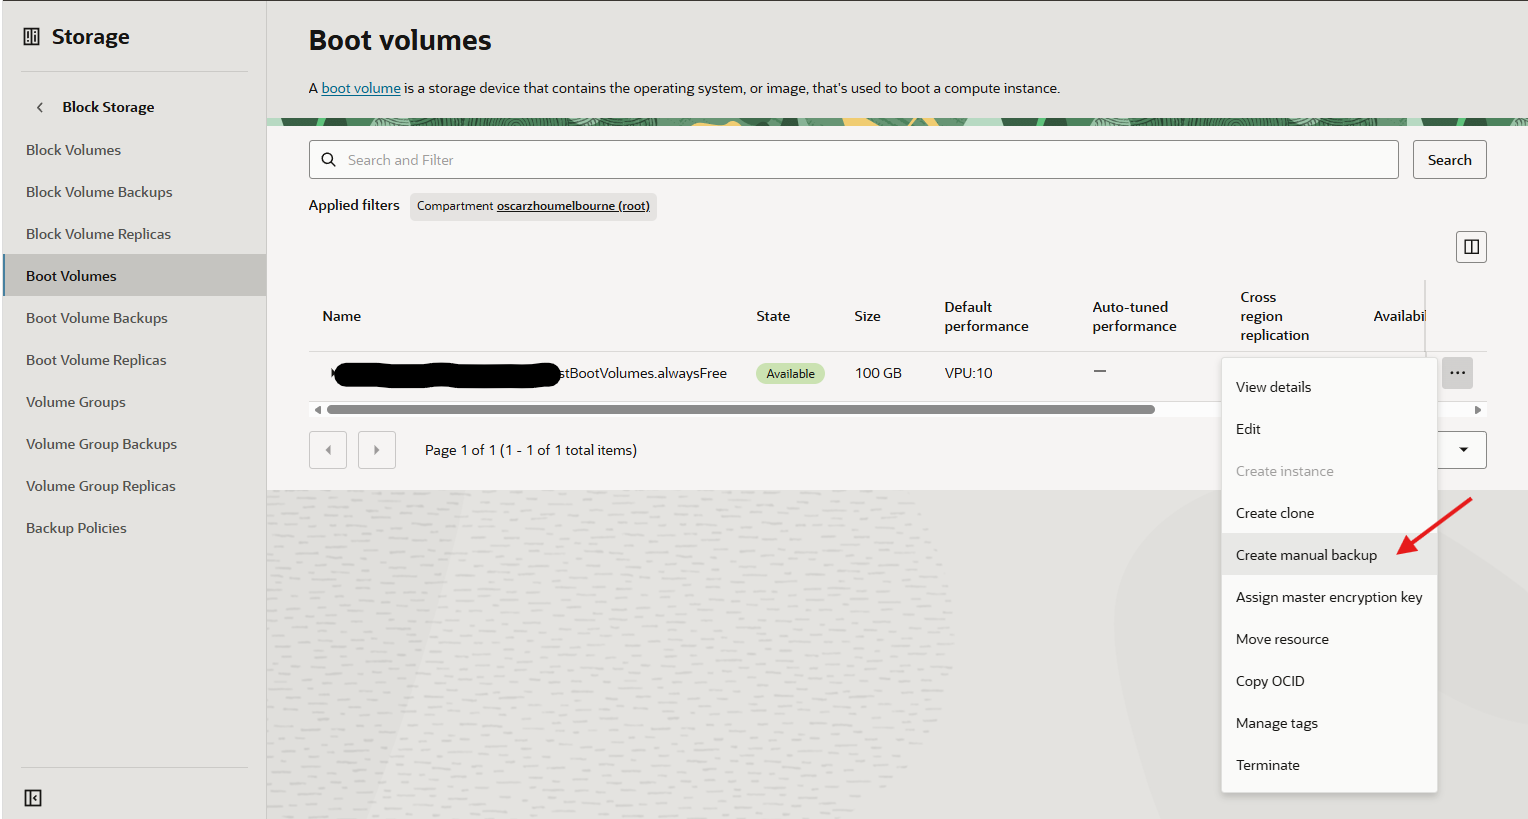
Backing up your boot volume secures all essential components like configuration files, databases, and application data that reside on your disk. This step is crucial, particularly for self-hosted services, as it guarantees you have a recoverable copy if you encounter unexpected issues later. Once a backup is securely in place, you’ve safeguarded your data, giving you more flexibility to proceed with the recovery steps.
Step 2: Upgrade the OCI Account to Pay As You Go
The most practical route I discovered was not launching a new instance but converting the OCI Free Tier account to Pay As You Go. While this might sound like a big commitment, it merely requires adding a payment method, turning your account into one that can handle billing when necessary.
Crucially, upgrading doesn’t mean your previous usage of the Always Free resources is suddenly billable. You maintain your free resources as long as you stay within the Always Free limits. However, now you’re also capable of using resources that might exceed these limits for a cost, and this flexibility is what you’ll need to reactivate your instance.
Step 3: Wait for the Upgrade to Complete
Following the account upgrade, there will be a waiting period, where you’ll see a “Upgrade in progress” notification in the OCI dashboard. It might take a couple of days before the upgrade is processed fully. Patience is essential here. Resist any temptation to interfere with the disabled instance during this time.
During the wait, your setup should consist of a disabled instance and a secured backup of the boot volume. Allow the upgrade to run its course, and do not make any changes or attempt any forceful recoveries. Once the upgrade completes, you should be ready to proceed without rebuilding from scratch.
Step 4: Your Existing Instance May Come Back
Upon the completion of your OCI account upgrade, often your instance will reactivate on its own. In my case, my original instance was restored without requiring any further action. This seamless recovery ensured continuity with my original settings, configurations, and all the painstakingly set-up services intact. Such preservation of the original setup saves considerable time and effort by eliminating the need to manually rebuild the server environment.
For users heavily relying on self-hosted applications, this outcome is ideal, as it restores the server with the operating system, Docker installations, configurations, and all associated components running as they were before.
Step 5: Resize the Instance Immediately
Once your instance is back online, promptly resize your compute resources to align with the current Always Free limits. If your previous setup utilized 4 OCPUs and 24 GB RAM, reduce these to 2 OCPUs and 12 GB RAM through the OCI’s shape configuration management. This modification might prompt a restart of your server, which is necessary to avoid potential billing for excess resource use.
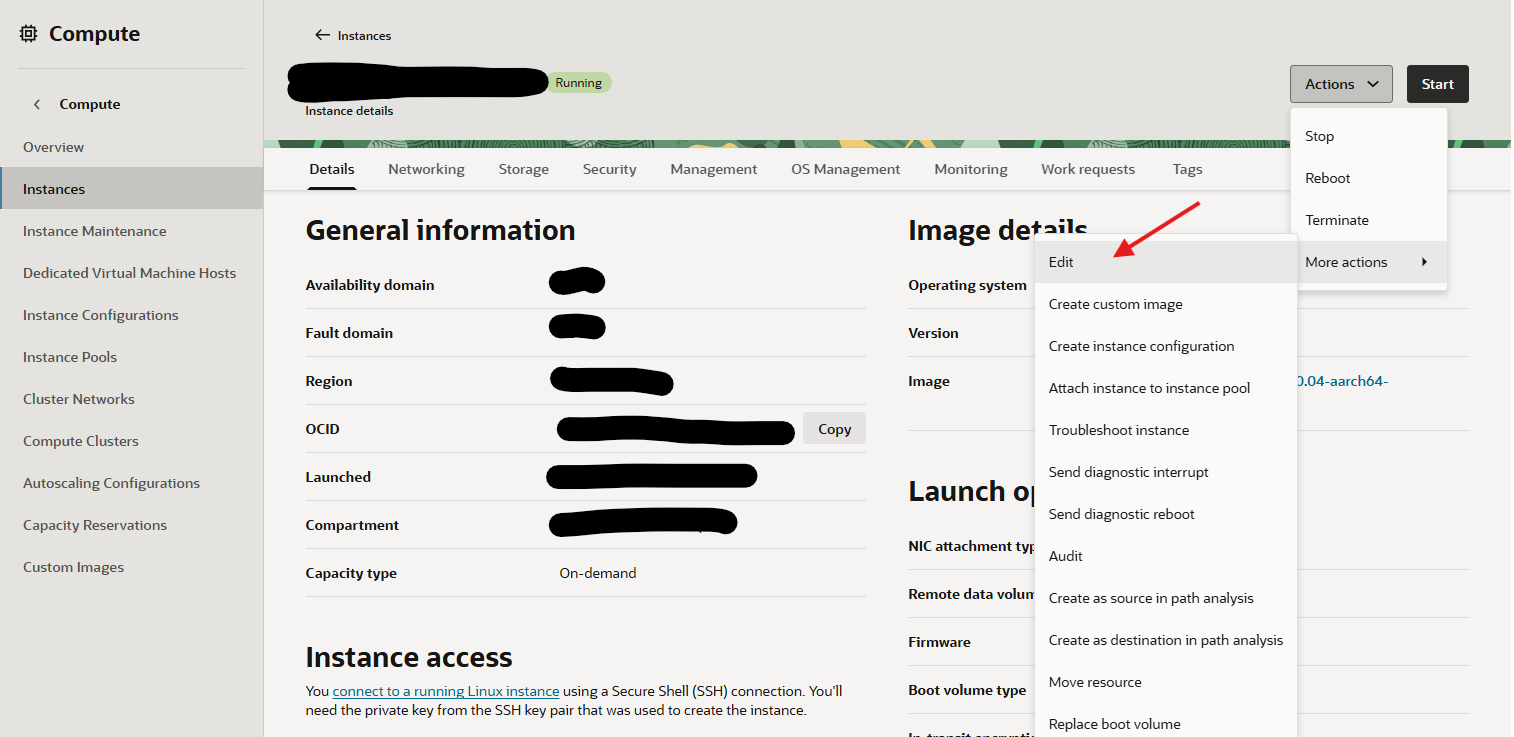
The resizing step ensures your continued use of the account’s free capabilities without incurring charges, a sensible decision considering the account’s transition to Pay As You Go. Thus, shrinking resource allocations aligns your instance with the allowable free tier scope.
Step 6: Check Your Self-Hosted Services
After resizing, verify that all your self-hosted services are functioning normally. Begin by establishing an SSH connection with the server and check active Docker containers using commands like docker ps and docker ps -a. If you’re using Docker Compose, confirm the status of your projects with docker compose ps.
Additionally, test all network services externally. Load your websites, examine the status of databases, ensure reverse proxy configurations are intact, and verify SSL certificates’ validity. Equally important is checking the memory allocation post-resize with free -h and docker stats. Make adjustments where necessary, particularly if resources formerly consumed near pre-reduction limits are now constricted.
What About Creating a New VPS From the Old Disk?
Should the original instance remain inaccessible, consider restoring from the backup to a new instance. Although this contingency plan can retrieve data by mounting the restored disk on another instance, it’s more disruptive than reactivating the original instance.
Rebuilding from scratch involves reconfiguration of network interfaces, IP addresses, and other numerous settings which are best avoided. Prioritize preserving the current VPS as your primary route of recovery, only resorting to the new instance creation if other methods fail.
Will Oracle Charge Me for My Previous 4 OCPU / 24 GB Usage?
One major concern when upgrading to Pay As You Go is potential retroactive charges for previous usage. However, Oracle doesn’t bill for past usage of free tier resources despite account upgrades, provided usage remains within the highlighted limits.
After the upgrade, though, vigilance is essential. Resources should be scaled to fit the Always Free guidelines - resize from 4 OCPUs/24 GB to 2 OCPUs/12 GB - to mitigate unauthorized costs. Review other configurations across your OCI setup to ensure resource consumption aligns with these allowances and prevent any unexpected charges.
The Recovery Plan
To summarize the recovery process for a disabled OCI Always Free instance, follow these sequential steps:
- Avoid deleting the instance.
- Securely back up the boot volume.
- Convert to a Pay As You Go account.
- Await completion of the upgrade.
- Expect the existing instance to resume service.
- Resize the instance to align with free tier limits.
- Verify and test all restored services.
This measured approach allowed me to recover my instance without the need for complicated reconstructions or extensive downtime, preserving the setup as it was originally intended.
Don’t Panic
The unexpected sight of a disabled server, integral to your personal or professional services, can be daunting. Yet, it’s crucial to recognize that the data and infrastructure remain intact despite superficial inaccessibility.
Stay calm and adhere to guidelines: Don’t delete the instance or boot volume hastily. Backup first, proceed with an account upgrade, and allow time for reactivation. A thoughtful, step-by-step recovery plan ensures functionality resumes broadly as it was, without forcing a full-fledged rebuild from the ground up. My experience assures this process is both effective and less cumbersome.
In summary, keep steady, deliberate steps at the forefront of your recovery strategy, and your Always Free instance will be back operational with entirely preserved configurations.
Enjoyed this article? Support my work with a coffee ☕ on Ko-fi.