
Setting up a new digital environment can be intimidating, but with this guide, installing the FastIndex GitHub repository on a DigitalOcean server becomes a breeze. Follow along to get your FastIndex application up and running!
Step-by-Step Installation Instructions
1. Create and Access Your Droplet
Start by creating a new droplet on DigitalOcean. Once ready, access your server via SSH:
cd ~/.ssh && ssh -i ./digitalocean/id_rsa "root@<ip_addr>"
2. Update and Upgrade Your Server
Ensure your server is updated and upgraded. If prompted to keep a version, choose “keep the local version currently installed.”
sudo apt update && sudo apt upgrade -y
3. Install PHP 8.2
FastIndex requires PHP. Add the necessary repository and install PHP 8.2 along with essential extensions:
sudo apt install software-properties-common -y
sudo add-apt-repository ppa:ondrej/php -y
sudo apt update
sudo apt install php8.2 php8.2-cli php8.2-fpm php8.2-mysql php8.2-xml php8.2-mbstring php8.2-zip php8.2-curl php8.2-gd php8.2-bcmath php8.2-soap -y
4. Install Composer
Composer is needed for handling PHP dependencies. Install it with:
sudo apt install curl -y
curl -sS https://getcomposer.org/installer | php
sudo mv composer.phar /usr/local/bin/composer
composer --version
5. Install Node.js (Version 18 or Higher)
Node.js is crucial for FastIndex. Set up and install Node.js version 18:
curl -fsSL https://deb.nodesource.com/setup_18.x | sudo -E bash -
sudo apt install -y nodejs
node -v
npm -v
6. Install SQLite PHP Extension
FastIndex uses SQLite. Install the necessary extension and restart your web server:
sudo apt install php8.2-sqlite3
sudo systemctl restart apache2   # If using Apache
sudo systemctl restart php8.2-fpm # If using NGINX with PHP-FPM
php -m | grep sqlite3
7. Clone the Project and Install Dependencies
Navigate to your web directory, clone FastIndex, and set up dependencies:
cd /var/www
composer create-project maurocasas/fastindex
cd fastindex
npm install
npm run build
php artisan db:seed
php artisan serve --host=0.0.0.0 --port=8000
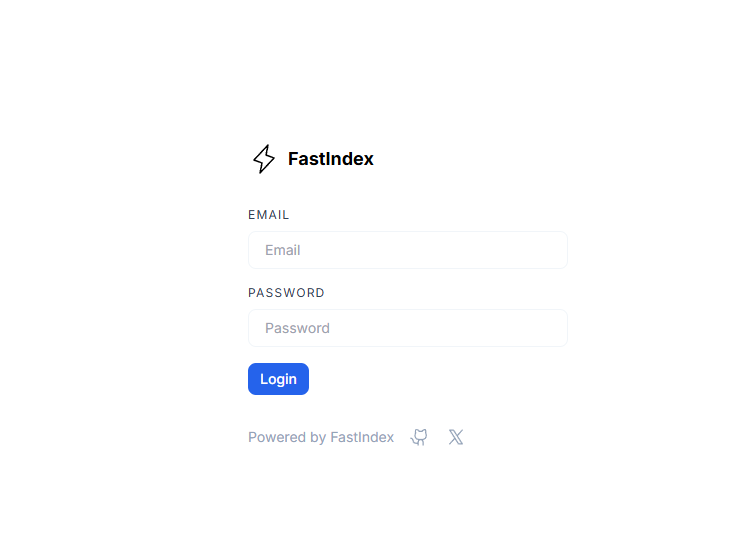
8. Access the Application
Access FastIndex at http://<ip-addr>:8000 using the default credentials:
Email: user@user.com
Password: password
9. (Optional) Setup a Web Server
To boost security and manageability, consider setting up a web server like NGINX. Install NGINX with:
sudo apt install nginx -y
9.1. Create NGINX Configuration File
Configure NGINX to serve your application:
sudo nano /etc/nginx/sites-available/fastindex
server {
    listen 80;
    server_name your_server_ip;
    root /var/www/fastindex/public;

    index index.php index.html index.htm;

    location / {
        try_files $uri $uri/ /index.php?$query_string;
    }

    location ~ \.php$ {
        include snippets/fastcgi-php.conf;
        fastcgi_pass unix:/var/run/php/php8.2-fpm.sock;
    }

    location ~ /\.ht {
        deny all;
    }
}
9.2. Enable the Site and Restart NGINX
Link your configuration to sites-enabled, test it, and restart NGINX:
sudo ln -s /etc/nginx/sites-available/fastindex /etc/nginx/sites-enabled/
sudo nginx -t
sudo systemctl restart nginx
In just a few straightforward steps, you’ve set up FastIndex on DigitalOcean, paving the way for smooth deployment and maintenance of your application. Whether you’re a seasoned developer or just starting out, this guide has equipped you with the knowledge to master server setups.
Enjoyed this article? Support my work with a coffee ☕ on Ko-fi.
