
Setting up a local HTTPS environment is essential for developers wanting to test web applications under conditions that closely resemble production settings. This guide will help you establish a local Nginx reverse proxy using Docker Compose without the need for a domain or public IP, focusing specifically on Portainer as a sample application.
Why You Want a Local Nginx Setup for Debugging
When developing or debugging services like web dashboards or APIs, having an environment that closely mimics production is critical. A local Nginx reverse proxy enables you to:
- Simulate actual production behavior.
- Enable HTTPS locally to catch cookie, CORS, and origin issues early.
- Create a safe, disposable setup with no public exposure and without needing to purchase a domain or public IP.
This local setup allows you to keep everything contained within your development machine while avoiding the complexities of managing cloud infrastructure.
Architecture Overview
In this post, I will host a Portainer server behind an Nginx reverse proxy as an example. The final setup will include:
- nginx-proxy: Serves as the reverse proxy, terminating HTTPS and routing traffic based on hostname.
- Portainer: A management interface for Docker and Kubernetes, running internally on Port 9000.
- Local Domain: Use a fake domain name, like
dev.portainer.local. - Self-Signed TLS Certificate: Allows HTTPS connections without a CA-signed certificate.
Together, these components will create a local network environment that is both effective and easy to debug.
Step 1: Create a Local Domain (hosts file)
Since you don’t own a real domain, you can fake one by editing your system’s hosts file.
For macOS or Linux: Open the terminal and edit the /etc/hosts file:
sudo nano /etc/hosts
Then, add the following line:
127.0.0.1 dev.portainer.local
For Windows: Open Notepad as an administrator and edit C:\Windows\System32\drivers\etc\hosts to include:
127.0.0.1 dev.portainer.local
With this configuration, your requests for dev.portainer.local will be redirected to your local machine.
Alternative: Use nip.io for Dynamic Local Domains
If you prefer not to modify your hosts file, you can use a service like nip.io, which provides wildcard DNS for local IP addresses. For example, using 127.0.0.1.nip.io will resolve to 127.0.0.1 without any hosts file changes.
But you’ll still need to generate a TLS certificate for this domain.
Step 2: Generate a TLS Certificate (Self-Signed)
For local development, you don’t need a CA-signed certificate. Instead, you can create a self-signed certificate using OpenSSL, but this can be cumbersome.
Easier option: OneClickTLS
To simplify certificate creation, use the free tool OneClickTLS. With OneClickTLS, you can:
- Generate a server certificate and key in seconds.
- Specify your local domain (
dev.portainer.local). - Download ready-to-use PEM files without the hassle of ensuring CA compatibility.
Here is a screenshot of the OneClickTLS interface:
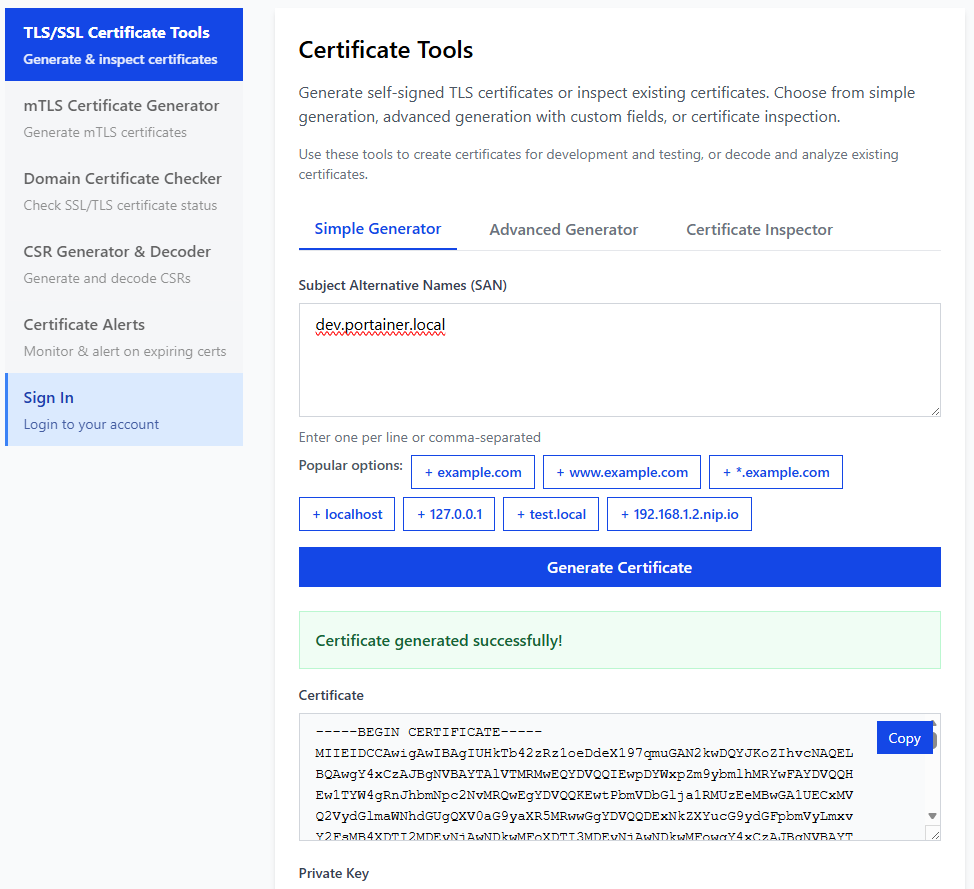
You can either copy the generated certificate and key directly or download them as files from the site. If you choose to download, rename them appropriately for your use case. .pem files can be renamed to .crt and .key for Nginx compatibility
For Nginx, ensure you have:
dev.portainer.local.crtdev.portainer.local.key
If you use different domains, you need to adjust the filenames accordingly.
Save these files in a local directory:
./certs/
dev.portainer.local.crt
dev.portainer.local.key
Step 3: Docker Compose with Nginx + Portainer
Now, let’s create a Docker Compose file that defines our local environment.
Here’s a sample Docker Compose configuration:
 1services:
 2  nginx-proxy:
 3    image: nginxproxy/nginx-proxy
 4    restart: always
 5    ports:
 6      - "443:443"
 7    volumes:
 8      - /var/run/docker.sock:/tmp/docker.sock:ro
 9      - ./certs:/etc/nginx/certs:ro         // <--- Mount your certs here
10
11  portainer:
12    image: portainer/portainer-ee:lts
13    command: -H unix:///var/run/docker.sock --trusted-origins=dev.portainer.local
14    restart: always
15    environment:
16      - VIRTUAL_HOST=dev.portainer.local
17      - VIRTUAL_PORT=9000
18    ports:
19      - "8000:8000"
20    volumes:
21      - /var/run/docker.sock:/var/run/docker.sock
22      - portainer_lts_data:/data
23
24volumes:
25  portainer_lts_data:
Important Notes
- We use port 443 for HTTPS to avoid any issues with applications, like Portainer, that do not support specifying ports in
trusted-origins. - This design keeps everything streamlined and compatible with production expectations.
Step 4: Why We Use Port 443 (Important Lesson)
While it’s technically possible to use a non-standard port like 8443, this often leads to unexpected issues. For example:
Accessing your setup via https://dev.portainer.local:8443 would result in an “Invalid origin” error during login because:
- The browser sends:
https://dev.portainer.local:8443 - Portainer expects:
dev.portainer.local
The solution is simple: always use standard HTTPS on port 443. This practice prevents port mismatch problems and adheres to production conventions.
Step 5: Start Everything
To start your services, navigate to the directory containing docker-compose.yml, make sure certs folder is in place, and run:
docker-compose up -d
Once the services are up, open your web browser and visit:
https://dev.portainer.local
You might see a warning due to the self-signed certificate; go ahead and accept it. You should then see the Portainer interface load successfully, confirming your local HTTPS setup is working as intended.
Why This Setup Is Worth It
This local Nginx and HTTPS configuration offers several key benefits:
- Faster Iteration: Local testing reduces delays compared to cloud-based staging.
- No Public Exposure: Maintain security by keeping everything contained.
- Early Issue Detection: Catch HTTPS, proxy, and origin-related problems before deployment.
- Versatility: Reuse this setup for various applications, including APIs and OAuth testing.
With this pattern, you can create numerous local environments tailored for different needs without risking exposure or incurring costs.
Final Thoughts
Local development environments can be powerful tools. By leveraging Docker, Nginx, and a simple local domain, you can quickly establish a setup that mirrors your production environment. If you ever find the task of generating TLS certificates tedious, remember that OneClickTLS is available to streamline the process.
With this configuration, you’ll be well-prepared to tackle debugging and testing in a environment that closely resembles production.
Enjoyed this article? Support my work with a coffee ☕ on Ko-fi.
