
1. Introduction
No matter if you are a software developer, a quality assurance engineer, or a DevOps engineer, you may need to generate a self-signed mutual TLS(mTLS) or TLS certificates and keys for testing purposes. As the title shows, this post is not a click bait. I will show you how to generate a self-signed TLS certificate and key in 10s for both server and client. Of course, if you have mTLS certificate and key files, you can also use part of them as self-signed TLS certificate and key.
1.1 Nov 2025 Update
I originally wrote this post a couple of years ago to document my workflow for creating self-signed certificates.
Since then, I’ve built a small online tool called OneClickTLS that lets you generate TLS and mTLS certificates instantly in your browser.
Just enter your Common Name (CN) and Subject Alternative Names (SANs), and it will give you ready-to-use certificate and key files.
1.2 Oct 2025 Update
Here is an alternate way to generate self-signed mTLS certificates and keys using openssl command if you don’t have docker installed. This will take a bit longer, 15s or so 😃.
Create cert.sh file with the following content:
 1#!/bin/bash
 2
 3export CURRENT=$(pwd)
 4export HOST="example.com"  # <------ replace with your domain name or IP address
 5export CERTDIR="./mtls-certs"
 6
 7mkdir -p ${CERTDIR}
 8cd ${CERTDIR} || exit
 9echo "Generating example mTLS certs into $(pwd)"
10
11if [[ ! -f "ca.pem" ]]; then
12    echo "Generate the CA Cert"
13    openssl genrsa -aes256 -out ca-key.pem 4096
14    # enter a pass phrase to protect the ca-key
15
16    openssl req -new -x509 -days 365 -key ca-key.pem -sha256 -out ca.pem
17else
18    echo "ca.pem ca cert already exists"
19fi
20
21if [[ ! -f "server-cert.pem" ]]; then
22    echo "Generate the Portainer server cert"
23    openssl genrsa -out server-key.pem 4096
24
25    openssl req -subj "/CN=$HOST" -sha256 -new -key server-key.pem -out server.csr
26    rm extfile.cnf
27    echo subjectAltName = DNS:$HOST >> extfile.cnf
28    echo extendedKeyUsage = serverAuth >> extfile.cnf
29
30    openssl x509 -req -days 365 -sha256 -in server.csr -CA ca.pem -CAkey ca-key.pem \
31    -CAcreateserial -out server-cert.pem -extfile extfile.cnf
32else
33    echo "server-cert.pem ca cert already exists"
34fi
35
36if [[ ! -f "agent-cert.pem" ]]; then
37    echo "Generate an Agent cert"
38    openssl genrsa -out agent-key.pem 4096
39
40    openssl req -subj '/CN=client' -new -key agent-key.pem -out agent-client.csr
41    echo extendedKeyUsage = clientAuth > agent-extfile.cnf
42
43    openssl x509 -req -days 365 -sha256 -in agent-client.csr -CA ca.pem -CAkey ca-key.pem \
44    -CAcreateserial -out agent-cert.pem -extfile agent-extfile.cnf
45else
46    echo "agent-cert.pem ca cert already exists"
47fi
48
49echo "done: Generated example mTLS certs into $(pwd)"
50cd "${CURRENT}" || return
Change the permission to make it executable chmod +x cert.sh, then run it ./cert.sh.
Once you run it up, you will be prompted to enter a pass phrase to protect the ca-key.pem. Just add a pass phrase you like. And you will use few times in the later prompts.
You will also be prompted to enter Common Name (CN), you need to enter your domain name or IP address you set in the HOST variable of the script again.
Then it’s done. You can find the generated self-signed mTLS certificate and key files in the mtls-certs directory.

2. Generate Your Custom Self-Signed mTLS Certificate and Key in 10s 🚀🚀
If you are in a hurry, you can copy and paste the following commands to generate a self-signed mTLS certificate and key. Please make sure you have Docker installed on your machine first before running the following commands. Otherwise, you’ll take longer than 10s to get the self-signed mTLS certificate and key files’ generation done.
1mkdir -p certs
2
3docker run \
4  --rm \
5  -v $(pwd)/certs:/data \
6  -e CN="example.com,182.12.23.144" \
7  --name gentls \
8  oscarzhou/gentls:latest
💡Line 5: You will need to mount your local directory to the container’s /data directory. The generated self-signed mTLS certificate and key files will be saved in the /data directory.
💡Line 6: Replace the value of CN to your domain name or IP address. If you test in your local environment, it is better to use your LAN IP address, such as 192.168.1.101. You still can use localhost or 127.0.0.1. Just make sure that your client and server are in the same subnet. For example, if your server is hosted in WSL, and your client is in Windows, the localhost or 127.0.0.1 will not work. In such case, just use the IP address of your WSL. If you need to configure multiple IP addresses or mixed IP addresses and domain names, you can separate them with commas, like example.com,182.12.23.144.
💡Line 8: The oscarzhou/gentls is the name of the container. Yes, I created this tool. You can find this project in my GitHub repository here. If you feel it’s helpful, please ⭐ it
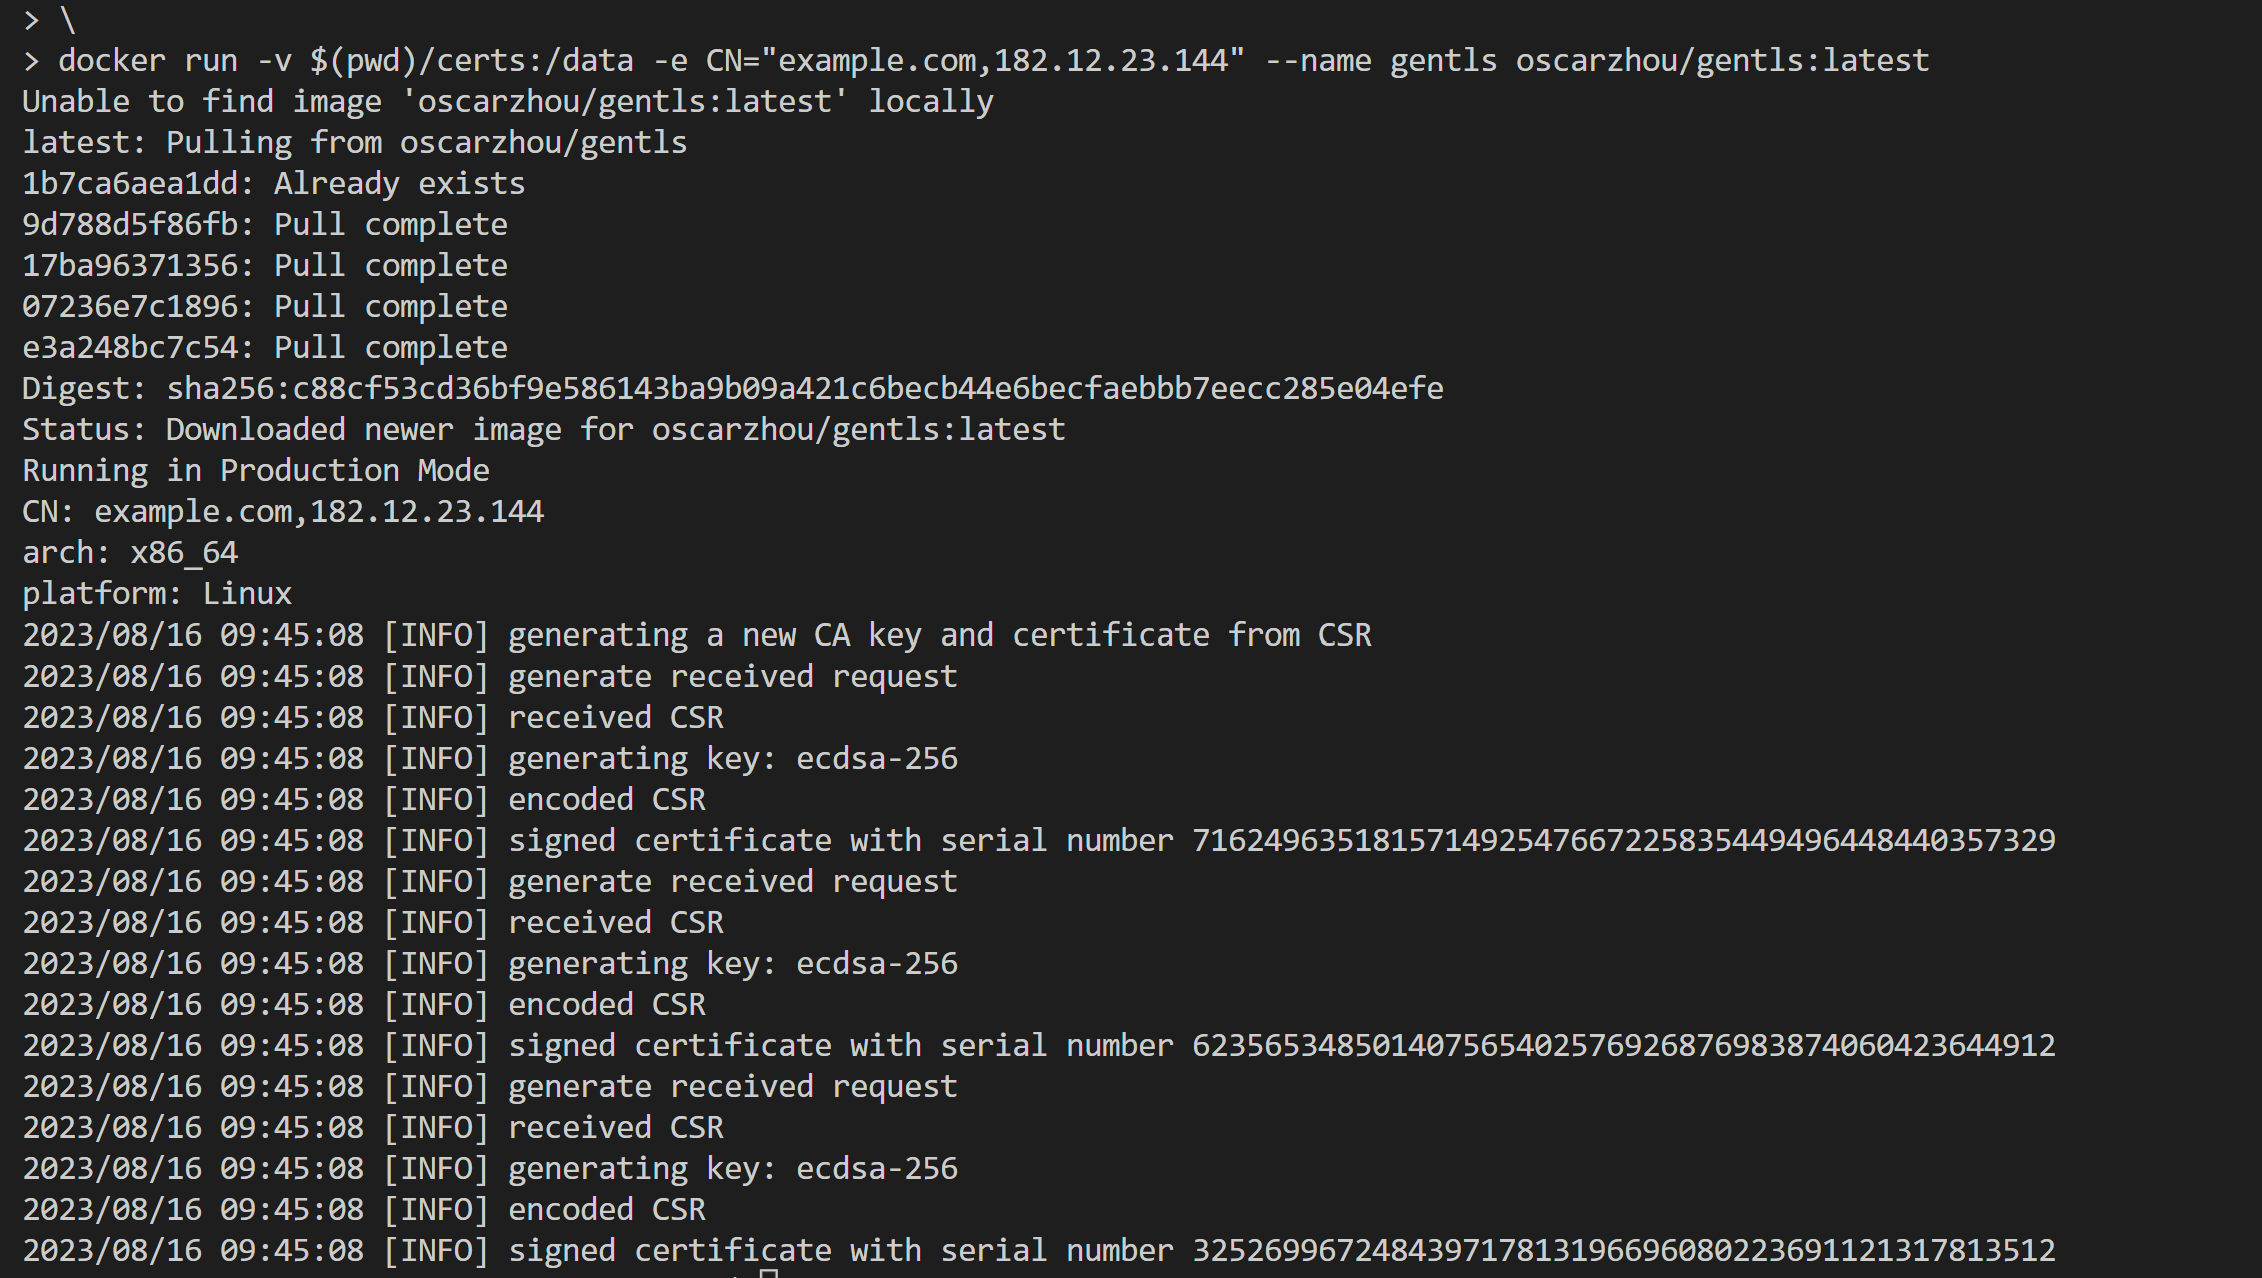
If you successfully run it, you should see the output similar to above screenshot. You can find the generated self-signed mTLS certificate and key files in the certs directory.
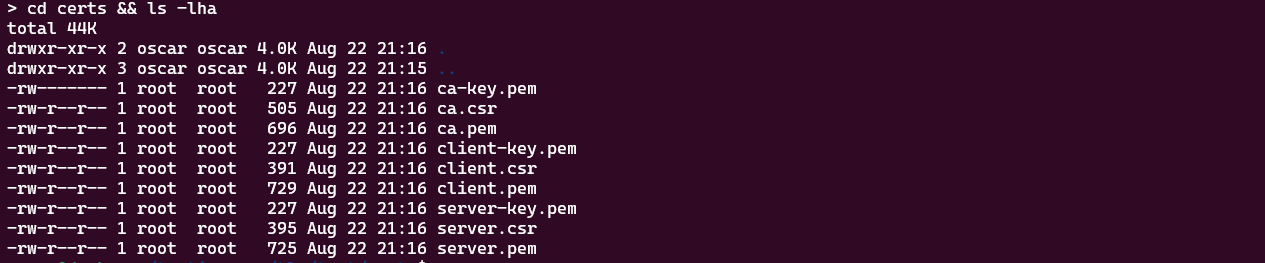
Note that the generated files are root-owned. You may need to change the ownership of the generated files to your current user. You can use the following command to change the ownership of the generated files to your current user.
sudo chown -R $(id -u):$(id -g) certs
If you are interested in this topic, you can continue to read below sections. I will explain the generated files and how to use them for mutual TLS and normal TLS.
3. Explain the Generated Files
To establish a secure communication between a server and a client using HTTPS (TLS/SSL), you would typically need server and client certificates and private keys. The server certificate is used to prove the server’s identity to the client, while the client certificate is used to prove the client’s identity to the server. The private keys are used to decrypt messages encrypted with the public keys of the certificates. Let’s break it down.
Server Side:
-
Server Certificate (
server.pem) and Private Key (server-key.pem):- The server certificate (
server.pem) contains the public key of the server and is used to prove the server’s identity to clients. - The private key (
server-key.pem) is kept securely on the server and is used for decrypting messages encrypted with the server’s public key.
- The server certificate (
-
Certificate Authority (CA) Certificate (
ca.pem):- This is the self-signed certificate of your own CA (Certificate Authority) that you trust. It’s used to sign the server’s certificate and forms the basis of trust for clients connecting to your server.
Client Side:
-
Client Certificate (
client.pem) and Private Key (client-key.pem):- While client certificates are not always necessary, you mentioned that you want to configure
client.pemandclient-key.pemon the client side. Client certificates can be used for client authentication, where the client proves its identity to the server. If you don’t need client authentication, you can skip this step.
- While client certificates are not always necessary, you mentioned that you want to configure
-
Server’s CA Certificate (
ca.pem):- The same CA certificate (
ca.pem) used on the server side should be configured on the client side as well. This allows the client to verify the server’s certificate during the TLS handshake.
- The same CA certificate (
Communication Flow:
-
The server program should be started with its server certificate (
server.pem) and private key (server-key.pem). It should also be configured to use the CA certificate (ca.pem) to validate client certificates during the TLS handshake if client authentication is enabled. -
The client program should be configured with its client certificate (
client.pem) and private key (client-key.pem) if client authentication is enabled. It should also have the CA certificate (ca.pem) to validate the server’s certificate during the TLS handshake.
Remember to properly secure the private key files (server-key.pem and client-key.pem) since they are sensitive and should not be accessible to unauthorized users. Additionally, ensure that the file paths and configurations in your programs are correctly set to point to these certificate and key files.
If you’re using a popular programming language like Python, Java, or Node.js, there are libraries and frameworks available that simplify the process of setting up HTTPS connections, including handling certificates and keys.
4. Verify the Generated Self-Signed mTLS Certificate and Key
If you want to verify the generated self-signed mTLS certificates and keys, you can use openssl to verify them.
openssl verify -CAfile ca.pem server.pem
openssl verify -CAfile ca.pem client.pem
It should return OK if the verification is successful.
5. Use the Generated Files for Normal TLS
For a normal TLS (Transport Layer Security) connection, often referred to as SSL/TLS, only server authentication is involved. In this scenario, the client verifies the authenticity of the server using the server’s certificate. Here’s the typical workflow and the files needed for a normal TLS connection:
Server Side:
-
Server Certificate (
server.pem) and Private Key (server-key.pem):- The server certificate (
server.pem) contains the public key of the server and is used to prove the server’s identity to clients. - The private key (
server-key.pem) is kept securely on the server and is used for decrypting messages encrypted with the server’s public key.
- The server certificate (
-
Certificate Authority (CA) Certificate (
ca.pem):- This is the self-signed certificate of your own CA (Certificate Authority) that you trust. It’s used to sign the server’s certificate and forms the basis of trust for clients connecting to your server.
Client Side:
- CA Certificate (
ca.pem):- The CA certificate (
ca.pem) is needed on the client side to verify the server’s certificate during the TLS handshake.
- The CA certificate (
Communication Flow:
-
The client initiates a connection to the server using HTTPS (TLS/SSL) by providing the server’s URL.
-
The server presents its server certificate (
server.pem) during the TLS handshake. -
The client’s SSL/TLS library uses the CA certificate (
ca.pem) to verify the server’s certificate. It checks the certificate chain, expiration dates, and other details to ensure the certificate is valid. -
If the certificate is valid, the client and server establish a secure encrypted communication channel using the negotiated cipher suite and encryption keys.
-
The client can then send HTTP requests and the server can send responses over the secure channel.
Compared to the communication flow explained in Section 3, it’s clearly that the communication flow of normal TLS is much easier than mTLS. So the generated certificates and keys are enough for a normal TLS connection, the server certificate (server.pem) and the CA certificate (ca.pem) are the primary files needed. The client uses the CA certificate to validate the server’s certificate during the TLS handshake.
Remember that securing your private key (server-key.pem) and other sensitive files is crucial for maintaining the security of your TLS connections. Additionally, while mutual TLS (mTLS) provides additional security by requiring both client and server certificates, normal TLS provides server authentication and encrypted communication for most use cases.
5. Example: Host Docker Registry with Self-Signed TLS Certificate and Key
Go to the gentls repository, there is a script file registry.sh in the root directory. You can simply run this script to setup a secure Docker registry using TLS. And the TLS certificate and key files are generated by the gentls tool.

The Docker registry default port is 5000. We can access the registry via https://172.17.221.208:5000 (Replace the IP address with your own IP address).
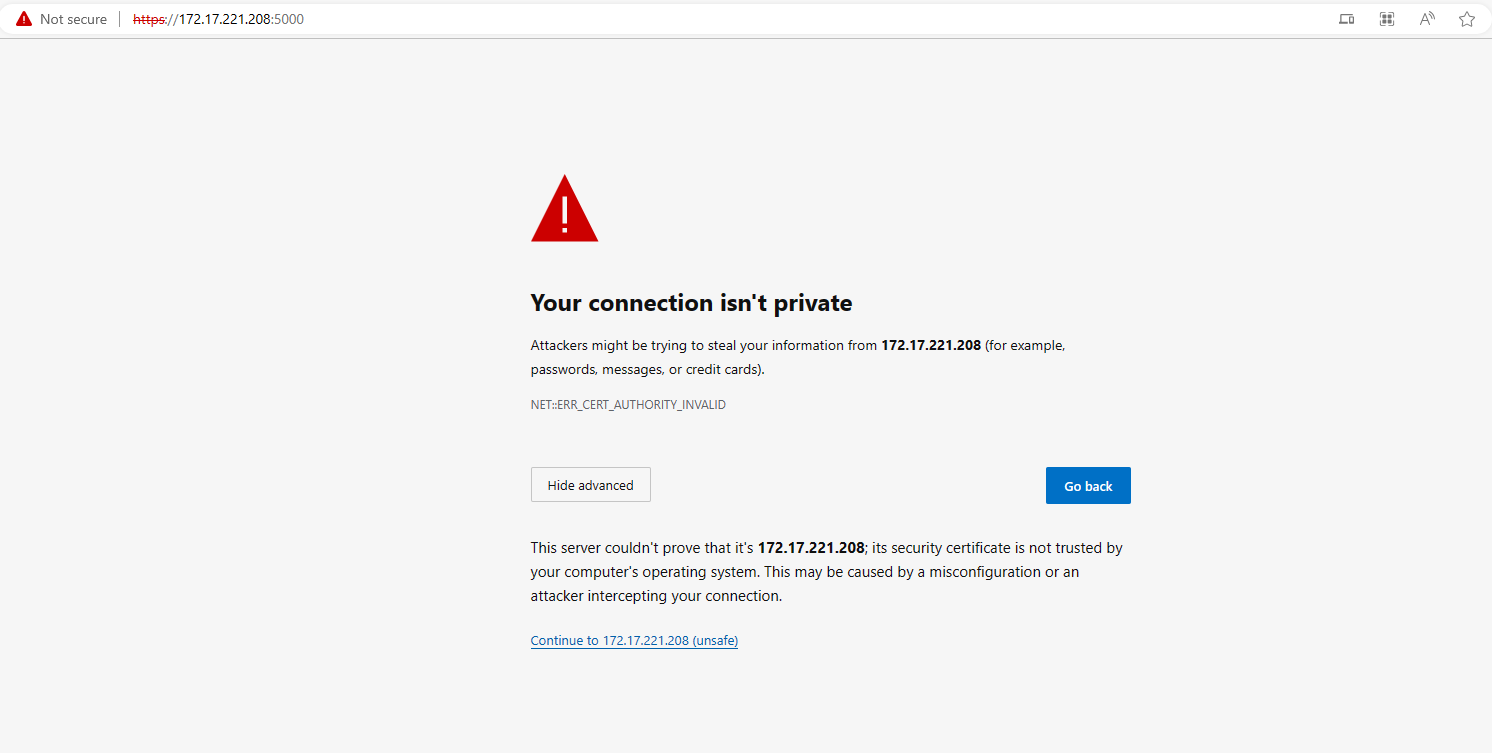
Great. The web browser shows that the Docker registry is using TLS. Let’s validate it further with curl. We can try to list the repositories in the registry by the following command.
curl -X GET https://172.17.221.208:5000/v2/_catalog

As expected, the curl command fails. It shows that the certificate is not trusted. We can use the --cacert option to specify the CA certificate file. Let’s try again with the generated ca.pem file.
curl -X GET --cacert ./certs/ca.pem https://172.17.221.208:5000/v2/_catalog

Voila! It works. We can see the list of repositories in the registry. It means that the TLS connection is established successfully. In turn, our generated TLS certificate and key files are valid.
You can also skip manual steps by using OneClickTLS.
Enjoyed this article? Support my work with a coffee ☕ on Ko-fi.
